
Thursday, 26 December 2013
Little or nothing going on.
The way the weather has been over the last few months has kept me well and truely out of the garden, if its not freezing its raining or worst of all blowing a gale. A few weeks back we had very high winds with gusts up to 80mph which caused abit of damage. The greenhouse lost several panes of glass as well as some of the roofing sheets. Which made me a bit depressed. I have since replaced most of the broken panes and re attached the roof sheets but one has disappeared completely! So I will have to buy another. But as I sit here writing this another 'storm' is heading our way and I sit and hope that more hard work is not undone! The garden sits in a bit of a wind tunnel and has little shelter from any high winds but there is not a great deal that I can do about it at the moment. Its just a matter of sitting it out and hoping everything will stay intact. Roll on spring and can not wait!
Sunday, 24 November 2013
Soil Improvement, the Plan!
Having the best soil is something that every gardener wants and strives for. We all do something to improve it every year whether it be applying manure, compost, compost tea, fertiliser or even growing green manure. If we want good results we NEED good soil. And like all gardeners with the internet I have spent many an hour reading blogs and watching YouTube video's on how to do this. I think I must have seen every way you can, to improve your soil by now! But strangely enough I was watching a documentary about the Amazon many months back that set me off on Terra Preta. The Documentary was from the BBC and was challenging our perceptions of the Amazon as a 'pristine wilderness' and one fact they used to do this was the existence of Terra Preta. Terra Preta is Portuguese for 'black earth' and is the most fertile soil in the world found only in the Amazon. This soil was man made and has been found to be located around sites that homed settle communities.Needless to say our modern view of the Amazon as a pristine wilderness may well be unfounded. Certainly the techniques employed by many of the tribes living there now (slash and burn) did not and are unable to produce Terra Preta. I highly recommend taking an hour of your time to watch the documentary below.
The BBC Documentary on the Amazon and the Pre Columbian Cultures.
After watching the documentary I started reading up online about Terra Preta, what it was, how it was made and what was in it. It seems it is a mixture of manure, organic matter and charcoal on the most basic level. So it seemed to me quite an easy thing to reproduce on my own plot of land. And other people are doing the same....See next video.
Although the above video was helpful I will be approaching it with a different recipe, with a few more added ingredients which I think will improve my soil more. The basic list is this.
1. Charcoal/Ash
2. Well rotted Leaf Mulch
3. Garden compost
4. Manure
5. Bokashi
6. Blood, Fish and Bone
Over the last couple of months I have been collecting these ingredients, wood, dried garden vegetation and sawdust from the chicken coop to make ash and charcoal with. I have a good stock of well rotted shredded leaf mulch as well as chicken manure on tap. The added ingredient for my improvement plan is Bokashi, which I have been adding to my mulch as well as some of the manure I have been collecting. What the Bokashi gives is good microbes needed for a healthy soil, breaking up the nutrients in all the other ingredients that I am adding. Come spring I will layer across my beds and dig in well and hey presto Terra Preta! Well probably not as easy as that but it should surely improve the soil no end.
Saturday, 23 November 2013
My Eggs are Free
So I have had my Hens for about 6 months now and after a slow start egg wise they all began laying an egg a day. This as it turns out is more eggs than I and the Mrs are willing to eat. Four eggs a day, 7 days a week is a lot of eggs to eat, but we do try. Amanda has had to do much more baking this year. Yum!
No matter how much baking and eating of eggs we do there is to much for us, so we have been selling the eggs to friends and colleagues for a very cheap £1 a half dozen. That £1 then gets put in to the chicken tin which is used to buy their feed. Yesterday I looked in the tin and found I had about £10 and decided to stock up on some feed. I bought some pellets, corn and some rice and spaghetti which are treats. They absolutely go crazy for some warm boiled rice or spaghetti, I'm sure they think they are maggots or worms, but what ever they think I feel happy that they have had a warm meal to keep them going as the weather gets colder. So it turns out I am getting my eggs for free, by selling them cheap to friends who appreciate a bargain, from looked after hens, that will not end up as cat food when they stop laying.
 |
| Beaky, Duchess, Matron and Speckle enjoying their warm treat on a frosty morning |
Monday, 11 November 2013

Friday, 25 October 2013
Getting Ready For 2014 Vegetables.
2013 brought many successes and a few failures in the veg garden. I grew more variety and more productively than ever. Of course certain thing (as there always is) didn't work, my brassica's where destroyed by caterpillars and my spuds had a scab problem. But generally its been a good year.
But its time to think about next year and what a year it should be with my new greenhouse and raised beds. With all the extra growing room its been really enjoyable seed shopping this year, and variety is the aim for next year. So I thought I would have a little run through of some of what I will be growing.
Sweetcorn
 I am going for two varieties next year, I will be growing one that I did this year called Double Standard Bicolor, which did great, the look and taste fantastic. The second variety I am growing will is called Eskimo White. This variety or the packet at least has come from Russia (this is a theme for next year). From what I have read it will do well in the short British growing season. The instructions are all in Russian and my Russian being what it is means I will be guessing on how to plant it! But I am sure it will be the same as any other corn variety.
Melons
 Now that I have a greenhouse I can finally grow in quantity all the good sweet things that do far better under glass. A few years ago I bought some melon seed and never grew them as I never had the space or the greenhouse so I gave them to my neighbour. The variety was called Minnesota Midget, my neighbour got them going and grew some lovely little melons. In return I got some melons and of course the seeds too. The Minnesota Midget is a very small melon roughly the size of a tennis ball and looks rather like a cantaloupe. It is very sweet and juicy and grow very well under glass in the UK, they of course as you can guess from the name come from America and were designed for short growing seasons and cooler climates. One melon is not enough for me it seems and I have also bought Watermelon seed called Blacktail Mountain. Another American variety this early watermelon again is designed for cooler climates and as such is a miniature. Even two melon types is not enough and I just acquired another variety simply called Russian Melon. I have no idea how big these will grow or what they taste or look like so it will be a surprise to see what happens.
Finally the last 'melon' i am going to grow is called the 'Incan Mouse Melon', also know as the Mexican Mouse Melon, it is believed to have been a staple food for Amerindians before us European's turned up. I am not sure if these are true melons at all but I have read they are small grape sized fruit similar in taste to a cucumber. This again has come from Russia and thus the information is all in Russian. This will be another experiment but I am sure some of you Americans will have come across this before.
Beetroot
I love beetroot and not just pickled. Chocolate and beetroot cake is soooo good. So every year I grow plenty, this year I grew two varieties Detriot and Cylindra and I will grow them again next year. The new addition to my beetroot family will be Touchstone Gold a very rare strain that I am told was near extinction a few years back. As the name suggests it is a yellow beet, I wonder if it stains your hands as bad as your normal beetroot?
French Bean
I have never got round to ever growing french beans, so for my first attempt I have gone for an heirloom variety 'Cherokee Trail of Tears'. This comes again from America but more specifically from the Cherokee Nation of Native North Americans. The history of this variety also adds to its prestige, being one of the few crops the Cherokee took with them when they were driven out of their native lands, hence the name 'Trail of Tears'.
Tomato
I am growing two new varieties next year as well as the ones I usually grow. The first is called 'Latah' a very early cherry tomato Idaho, USA. It tolerates a very cool summer and can crop as early as June/July. The other variety is called 'Millefleur Yellow Vine Tomato' and is a centiflor type. Centiflor's are a new type of tomato I am told growing hundreds of 3/4 inch fruits on huge flower truss's. It is safe to say I do not know what to expect with this. I can imagine how it is going to look.
Rhubarb
Finally another Russian acquisition, simply called on the packet 'Rhubarb XXL Size'. I would expect this is quite a late variety which will complement my early types I have already. The XXL size intrigues me and I look forward to seeing how big it will grow and if the taste will be as good. This I have bought as seed so its going to be a season or two before I get to see what this is really like.
I have also gone for some Elephant Garlic along with a more standard variety White Solent growing these both for the first time. The are already in the ground over wintering and doing well. Also already planted are my onions a Japanese variety of which i can not remember what they are called. Just got to get myself some blue potatoes and I will be happy!
But its time to think about next year and what a year it should be with my new greenhouse and raised beds. With all the extra growing room its been really enjoyable seed shopping this year, and variety is the aim for next year. So I thought I would have a little run through of some of what I will be growing.
Sweetcorn
 I am going for two varieties next year, I will be growing one that I did this year called Double Standard Bicolor, which did great, the look and taste fantastic. The second variety I am growing will is called Eskimo White. This variety or the packet at least has come from Russia (this is a theme for next year). From what I have read it will do well in the short British growing season. The instructions are all in Russian and my Russian being what it is means I will be guessing on how to plant it! But I am sure it will be the same as any other corn variety.
 Melons
 Now that I have a greenhouse I can finally grow in quantity all the good sweet things that do far better under glass. A few years ago I bought some melon seed and never grew them as I never had the space or the greenhouse so I gave them to my neighbour. The variety was called Minnesota Midget, my neighbour got them going and grew some lovely little melons. In return I got some melons and of course the seeds too. The Minnesota Midget is a very small melon roughly the size of a tennis ball and looks rather like a cantaloupe. It is very sweet and juicy and grow very well under glass in the UK, they of course as you can guess from the name come from America and were designed for short growing seasons and cooler climates. One melon is not enough for me it seems and I have also bought Watermelon seed called Blacktail Mountain. Another American variety this early watermelon again is designed for cooler climates and as such is a miniature. Even two melon types is not enough and I just acquired another variety simply called Russian Melon. I have no idea how big these will grow or what they taste or look like so it will be a surprise to see what happens.
 Finally the last 'melon' i am going to grow is called the 'Incan Mouse Melon', also know as the Mexican Mouse Melon, it is believed to have been a staple food for Amerindians before us European's turned up. I am not sure if these are true melons at all but I have read they are small grape sized fruit similar in taste to a cucumber. This again has come from Russia and thus the information is all in Russian. This will be another experiment but I am sure some of you Americans will have come across this before.
Beetroot
I love beetroot and not just pickled. Chocolate and beetroot cake is soooo good. So every year I grow plenty, this year I grew two varieties Detriot and Cylindra and I will grow them again next year. The new addition to my beetroot family will be Touchstone Gold a very rare strain that I am told was near extinction a few years back. As the name suggests it is a yellow beet, I wonder if it stains your hands as bad as your normal beetroot?
French Bean
I have never got round to ever growing french beans, so for my first attempt I have gone for an heirloom variety 'Cherokee Trail of Tears'. This comes again from America but more specifically from the Cherokee Nation of Native North Americans. The history of this variety also adds to its prestige, being one of the few crops the Cherokee took with them when they were driven out of their native lands, hence the name 'Trail of Tears'.
Tomato
I am growing two new varieties next year as well as the ones I usually grow. The first is called 'Latah' a very early cherry tomato Idaho, USA. It tolerates a very cool summer and can crop as early as June/July. The other variety is called 'Millefleur Yellow Vine Tomato' and is a centiflor type. Centiflor's are a new type of tomato I am told growing hundreds of 3/4 inch fruits on huge flower truss's. It is safe to say I do not know what to expect with this. I can imagine how it is going to look.
Rhubarb
Finally another Russian acquisition, simply called on the packet 'Rhubarb XXL Size'. I would expect this is quite a late variety which will complement my early types I have already. The XXL size intrigues me and I look forward to seeing how big it will grow and if the taste will be as good. This I have bought as seed so its going to be a season or two before I get to see what this is really like.
I have also gone for some Elephant Garlic along with a more standard variety White Solent growing these both for the first time. The are already in the ground over wintering and doing well. Also already planted are my onions a Japanese variety of which i can not remember what they are called. Just got to get myself some blue potatoes and I will be happy!
Wednesday, 9 October 2013
La Gomera, Tenerife, Fauna, Foliage, Flowers and My Sticky Fingers
Yesterday I returned from a week away in the very hot and very sunny Canary Islands, specifically Tenerife and the tourist centre of Los Cristianos. In between me trying to laze around and relax I spent a little time looking at the local plants. Los Cristianos itself has been well planted with palms, pines and flowering bushes of all kinds. Streets and gardens were full of fauna and flowers, most of which I had never seen before, I must have looked like a little fat kid in a sweetie shop, running round taking pictures and fondling the plants!! The resort has been well planted and really breaks up the view of the endless hotels and apartments that line this part of the coast. Here are a few pictures I took of the plants here.


Los Cristianos is tourist central and for at least one day I wanted to get away from that, so after much pleading with my partner I managed to get a day trip out to La Gomera an Island a short distance on the ferry from Tenerife. Here there are few people and fewer tourists. The island is small but very beautiful, the centre of which is a Unesco world heritage site due to its rare and specialised plant life. The forest here is I have to say a strange one, the majority of the trees look like overgrown heather and that is what they are. Tree heather! As a small volcanic island it is made up of steep cliffs around its circumference that reach in to the interior. The edges of the ravines all over the island have been terraced over the 500 years or so the Spanish have held it. This really makes you think you could be in the Andes in some old Incan village, it was I have to say a little surreal. All across the Canaries you will see Cactuses of different types, these are not native but were brought back by the Spanish from places like Mexico. Everywhere you look there seems to be one type of cactus or another growing, only on the highest peaks to the seem to disappear. It also seems each valley has its own micro climate, on leaving the island capital San Sebastian you see a dry and arid landscape littered with disused terracing but only in the next valley you find a wetter climate were banana groves, palms and pines rise up from the valley. La Gomera is most famous as the last part of the known world Columbus visited before setting sail for the Indies. On my trip around Gomera I again took a few pictures (below) but did not get any of the names.


Whilst going around Gomera I did pick up some seeds, I have no idea if they will grow here in the UK or even what plants they are. They were there and my sticky little fingers could not resist. Actually the only seed I picked up that I know what it is. is Blackberry. The fruit was small and hard and not very appetising but I still wanted the seed just to try them here. I'm sure the more knowledgeable gardeners will know the above plants, unfortunately I am still learning. As for Gomera, if you are holidaying in Tenerife a day trip to Gomera is a must! I fell in love with the place and I am currently try to persuade my partner to move there!
 |
| A Boulevard in Los Cristianos |
 |
| Cactus Tree? Its bloody amazing. |

 |
| Some kind of tree that looks very much like a fern. |


 |
| I just liked this little palm because it looks like a Pineapple |


 |
| A picture of the terracing that covers the island, most of which has fallen out of use. |

Whilst going around Gomera I did pick up some seeds, I have no idea if they will grow here in the UK or even what plants they are. They were there and my sticky little fingers could not resist. Actually the only seed I picked up that I know what it is. is Blackberry. The fruit was small and hard and not very appetising but I still wanted the seed just to try them here. I'm sure the more knowledgeable gardeners will know the above plants, unfortunately I am still learning. As for Gomera, if you are holidaying in Tenerife a day trip to Gomera is a must! I fell in love with the place and I am currently try to persuade my partner to move there!
Wednesday, 11 September 2013
The Potato Harvest 2013
A few days ago I harvested my potato's and was very happy with the amount I had grown. From a 12x5 foot bed I got 2 large sacks of King Edward potato's. The two bags are essential to this post and for all the wrong reasons. The reason being one of the bags is full of spuds with some sort of disease! Here is a particularly bad example of one....

It turns out the above diseases are at there worst through dry periods in the summer and I have to say I was not watering them enough. We had the hottest and dryest summers I can remember for a long time and certainly since I have been gardening and I was watering at the same levels as last year where we had a far wetter summer. So I have lived and learnt from this experience.
The spuds though won't go to waste, the most scabby ones have been boiled up as mash and fed the the chickens, they love it, Others with minor scabbing will be eaten first and hopefully the good bag will store well for winter. As a small back up I have some Nadine potato's growing in a tub for some Christmas new potatoes.

Half of my crop has these 'scabs' all over them, which is really annoying! Though they look abit black in the picture, fresh out of the ground they were brown in colour. At first I thought I might have had blight though having never had any diseased potatoes of any kind I was not sure! So On to the RHS website I went to confirm my fears that it was blight.
As it turns out the most likely candidate was not blight but Potato Scab!And whats worse it was probably my fault. The RHS says....
Common scab is caused by Streptomyces scabies and powdery scab by Spongospora subterranea f. sp. subterranea. Both are pathogenic micro-organisms and cause rough, scabby patches. Scabs appear during summer and persist on harvested tubers throughout storage.
It turns out the above diseases are at there worst through dry periods in the summer and I have to say I was not watering them enough. We had the hottest and dryest summers I can remember for a long time and certainly since I have been gardening and I was watering at the same levels as last year where we had a far wetter summer. So I have lived and learnt from this experience.
The spuds though won't go to waste, the most scabby ones have been boiled up as mash and fed the the chickens, they love it, Others with minor scabbing will be eaten first and hopefully the good bag will store well for winter. As a small back up I have some Nadine potato's growing in a tub for some Christmas new potatoes.
Thursday, 5 September 2013
Bokashi Composting
I have not met many people yet who use the Bokashi composting system (thats a bad way of putting it as I do not exactly go round asking people if they use it) and this surprises me as its an amazing way to compost. If you have no idea what I am talking about I will give a brief idea of what Bokashi is!
Basically you buy or make your own Bokashi bran, this is just bran that has been inoculated with certain 'good' bacteria that help the decomposition of food waste. You place your food waste, which unlike any other composting methods can include meat and dairy, into a bucket. The bucket must have a lid that makes it air tight when fastened on as the process of decomposition with bokashi needs an anaerobic environment to work. When your waste is in, you sprinkle on some bran and close the lid. Repeating the process until the bucket is full. When this happens you leave your bucket and let all those micro-organisms get to work for a few weeks, the waste is basically fermenting or pickling. If when you open your bucket you smell a sweet pickled smell the process is working.
What is a little strange about this process is the fact that the waste you have put in looks no different at the end. Don't expect to find a pile of lovely compost just yet. If you buy a bokaski bin they are basically buckets with a tap, similar I guess to a wormery or a homebrew barrel. The tap will give you your first product! A very strong liquid fertiliser rich in good micro-organism. I dilute mine 1-100 and it works fine, other sites suggest this might be overkill so next year I will experiment with that a little. One you have captured you fertiliser and the food waste has fermented for several weeks you can do a couple of things with it. I myself put it in the compost bin. by digger a hole in the centre and then put my bokashi waste in. Making sure to cover it all over with a bit of soil or what's in the compost. Leave this for a month or too and it will degrade in the compost. I left mine in over winter and cleaned out in the spring and it was brilliantly black moist compost. Your other option is to dig it in to a trench in your flower or veg beds and cover over with soil. A few months down the line if you dig were you buried it you will find a very rich black soil.
Bokashi has many uses and it really worth taking a look at, if you are really into being green it something I think you should try. As I said above ALL food waste can be composted safely with bokashi! Here is a video that probably explains it all a little better than me.
Bokashi is a method that uses a mix of microorganisms to cover food waste to decrease smell. It derives from the practice of Japanese farmers centuries ago of covering food waste with rich, local soil that contained the microorganisms that would ferment the waste. After a few weeks, they would bury the waste that weeks later, would become soil.
Basically you buy or make your own Bokashi bran, this is just bran that has been inoculated with certain 'good' bacteria that help the decomposition of food waste. You place your food waste, which unlike any other composting methods can include meat and dairy, into a bucket. The bucket must have a lid that makes it air tight when fastened on as the process of decomposition with bokashi needs an anaerobic environment to work. When your waste is in, you sprinkle on some bran and close the lid. Repeating the process until the bucket is full. When this happens you leave your bucket and let all those micro-organisms get to work for a few weeks, the waste is basically fermenting or pickling. If when you open your bucket you smell a sweet pickled smell the process is working.
What is a little strange about this process is the fact that the waste you have put in looks no different at the end. Don't expect to find a pile of lovely compost just yet. If you buy a bokaski bin they are basically buckets with a tap, similar I guess to a wormery or a homebrew barrel. The tap will give you your first product! A very strong liquid fertiliser rich in good micro-organism. I dilute mine 1-100 and it works fine, other sites suggest this might be overkill so next year I will experiment with that a little. One you have captured you fertiliser and the food waste has fermented for several weeks you can do a couple of things with it. I myself put it in the compost bin. by digger a hole in the centre and then put my bokashi waste in. Making sure to cover it all over with a bit of soil or what's in the compost. Leave this for a month or too and it will degrade in the compost. I left mine in over winter and cleaned out in the spring and it was brilliantly black moist compost. Your other option is to dig it in to a trench in your flower or veg beds and cover over with soil. A few months down the line if you dig were you buried it you will find a very rich black soil.
Bokashi has many uses and it really worth taking a look at, if you are really into being green it something I think you should try. As I said above ALL food waste can be composted safely with bokashi! Here is a video that probably explains it all a little better than me.
Sunday, 1 September 2013
A Poor Gardeners Addiction
I have been a busy bee in the garden recently with several little projects. Two of which have been garden planters for next year. With money being tight both have been made with free wood and things I had around the shed! I posted a few months ago a strawberry planter made from old waste pipe which worked well and I promised an up date on how well it was doing. Well nearly all is good with the planter however next spring I will make one big change to its design and that is to install an irrigation tube inside it. I found when watering it I was wasting large amounts of water and feed as it ran of and out of the planter. This addition will get its own post I'm sure.
I have to admit something now, I have a problem, a problem that is slowly taking over my everyday thoughts and effecting important decisions in my life! I am addicted to PALLETS! I have even started stealing them! I walk down a road and see one there I will come in the night and steal it! I spend hours of my life thinking about them, what i can make with them and where i can get some from! Its just not healthy anymore.....but I am just not ready to give them up.
Over the last year or so I have collected a few and made a few little planters here and there like this...

Its pretty ugly but my carrots did fine it it! I also built a garden theatre/shelf for plants, a gate and a bird house.

Now I've taken the next step in pallet addiction, THE WALL PLANTER!

This is an extremely common thing to do amongst the Pallet addicted peoples of the world, numerous examples can be found on the web if you go and look! This is my own very ugly one. Built with the pallet my greenhouse glass came on and some left over pallet bits. The back of the pallet is lined with some old hemp sack I had in the shed. I reckon many of you are looking at it and thinking "what a pile of ugly s#*t" and you would be right. But a lick of paint some compost and some plants it will come into its own! I hope.
Thursday, 15 August 2013
Building a Second Hand Greenhouse
I recently bought a very large second hand greenhouse online, it is 8ft x 12ft in size. I got it I think very cheap at only £80 from a site called preloved. I was shopping around on ebay where much smaller ones were going for well over £100. It was local and I collected already dismantled, which was great for time saving on collection (it never easy going to some one you don't knows house and being there long). This came back to bite me when it came to building again.
I don't do jigsaw puzzles ever, so to have hundreds if not thousands of bits in a pile with no idea how it all went together was very daunting. At this point I was wishing I had dismantled it myself. There are many lessons to be learnt from how I went about this project! If like me you get a greenhouse already dismantled and no instructions on how to rebuild it this is how to do it.
1. Ensure you have in stock extra greenhouse nuts and bolts, the cropped head type are extremely useful later on if you have missed out putting the standard square ones in. They can be slid into the rails after you have already bolted it together. For Cropped head see image below. Also extra glazing clips as you will not have all you need.

2. Sort out all your parts in to piles, each pile containing the same parts. From here you can work out what parts are what and if you have all the required frame. As if its already dismantled on arrival you just do not know its all there. Luckily for me it was.
3. Make sure you have a greenhouse base in place. I did not do this first, I skipped straight to step 4. As i understood it from reading online your greenhouse will be bigger that the stated size by a few inches. So I built my frame first to gage its true size. My base is made up of some old paving slabs that were already in the garden. Most people either use something like this or lays down a concrete either as an entire floor or for just under the frame. Make sure it is level and sturdy as this is what anchors your greenhouse to the ground.
4. Intuition and Common Sense. build your frame starting from the sides. I built my entire frame in half a day without instructions. I found that the greenhouse was designed in a way that makes it simple to erect, parts seemed to me to go on certain place by just taking of consideration. This said I did put things together and then take them apart again as i had done it wrong. If you can have a second pair of hands and another brain you should easily figure it all out! So build your two long sides first and then add your apex's. One you have these in place you can add the roof and you have a complete frame. Stand in side of it its starts to feel like a greenhouse a little.
5. Put your frame on your base and fix it down. I drilled into my slabs and fixed it down with 4 inch screws. The fixings were one in each corner and several along the sides. so it was well and truly anchored. Only a tornado is going to shift it.
6. Level your frame, it will be a little wonky and sqew in places. To do this take a level and check were its out and adjust your frame by loosening bolts and strong arming it into position. This pays dividends later when you come to glaze it all.
7. Glaze you greenhouse, when i bought my one I knew I was going to be short on glass so I ordered in some 4mm polycarbonate for the roof only so I would have enough glass for the sides. As it turns out even with this I am short as I broke several panes. When glazing, Glaze your roof first as you will have easy access to it while you have no sides on. The glass will be dirty and needs to be cleaned and the best was to do it is with warm water some cleaning product like flash and the big tip.....SAND. Place your payne on a flat surface drop a small blob of sand and scrub your pane with a sponge. It will come up like new. If like my greenhouse you have different sizes of glass take a moment to work out what glass goes where. With my greenhouse the sides needed one small pane and 2 large on the long sides. You will need to clip the glass to the greenhouse and the video below helped me work out how you did it.
When adding glass to the middle and top you will need another clip that the glass hangs on. There are to types and I used both. The first one is prefabricated and useful for the middle panes of glass as it keeps the level of the glass perfect, I think its called a Zclip. This is what it looks like....


For the top pane I found the following clip was best as it is flexible and helps give the best fit......

With all this you can get glazing and you will have it done within no time I promise. If your unfortunate like me the angles apex may be broken so invest in a glasscutter or buy some pre cut to size.
8. Get Growing!
I am sure I will have missed something out but if your doing this project you will work it out. It can be a little daunting at first but you will feel fulfilled by the end with your achievement. I know I am as I have a 12 x 8 greenhouse that has cost me less than £200 and some of my time.
If anyone has any questions regarding there own greenhouse build dont hesitate to ask I may be able to advise a little.
I don't do jigsaw puzzles ever, so to have hundreds if not thousands of bits in a pile with no idea how it all went together was very daunting. At this point I was wishing I had dismantled it myself. There are many lessons to be learnt from how I went about this project! If like me you get a greenhouse already dismantled and no instructions on how to rebuild it this is how to do it.
1. Ensure you have in stock extra greenhouse nuts and bolts, the cropped head type are extremely useful later on if you have missed out putting the standard square ones in. They can be slid into the rails after you have already bolted it together. For Cropped head see image below. Also extra glazing clips as you will not have all you need.

2. Sort out all your parts in to piles, each pile containing the same parts. From here you can work out what parts are what and if you have all the required frame. As if its already dismantled on arrival you just do not know its all there. Luckily for me it was.
3. Make sure you have a greenhouse base in place. I did not do this first, I skipped straight to step 4. As i understood it from reading online your greenhouse will be bigger that the stated size by a few inches. So I built my frame first to gage its true size. My base is made up of some old paving slabs that were already in the garden. Most people either use something like this or lays down a concrete either as an entire floor or for just under the frame. Make sure it is level and sturdy as this is what anchors your greenhouse to the ground.
4. Intuition and Common Sense. build your frame starting from the sides. I built my entire frame in half a day without instructions. I found that the greenhouse was designed in a way that makes it simple to erect, parts seemed to me to go on certain place by just taking of consideration. This said I did put things together and then take them apart again as i had done it wrong. If you can have a second pair of hands and another brain you should easily figure it all out! So build your two long sides first and then add your apex's. One you have these in place you can add the roof and you have a complete frame. Stand in side of it its starts to feel like a greenhouse a little.
5. Put your frame on your base and fix it down. I drilled into my slabs and fixed it down with 4 inch screws. The fixings were one in each corner and several along the sides. so it was well and truly anchored. Only a tornado is going to shift it.
6. Level your frame, it will be a little wonky and sqew in places. To do this take a level and check were its out and adjust your frame by loosening bolts and strong arming it into position. This pays dividends later when you come to glaze it all.
7. Glaze you greenhouse, when i bought my one I knew I was going to be short on glass so I ordered in some 4mm polycarbonate for the roof only so I would have enough glass for the sides. As it turns out even with this I am short as I broke several panes. When glazing, Glaze your roof first as you will have easy access to it while you have no sides on. The glass will be dirty and needs to be cleaned and the best was to do it is with warm water some cleaning product like flash and the big tip.....SAND. Place your payne on a flat surface drop a small blob of sand and scrub your pane with a sponge. It will come up like new. If like my greenhouse you have different sizes of glass take a moment to work out what glass goes where. With my greenhouse the sides needed one small pane and 2 large on the long sides. You will need to clip the glass to the greenhouse and the video below helped me work out how you did it.
When adding glass to the middle and top you will need another clip that the glass hangs on. There are to types and I used both. The first one is prefabricated and useful for the middle panes of glass as it keeps the level of the glass perfect, I think its called a Zclip. This is what it looks like....

And it works like this, you hook it to the bottom pane and sit the upper pane into it.....


With all this you can get glazing and you will have it done within no time I promise. If your unfortunate like me the angles apex may be broken so invest in a glasscutter or buy some pre cut to size.
8. Get Growing!
I am sure I will have missed something out but if your doing this project you will work it out. It can be a little daunting at first but you will feel fulfilled by the end with your achievement. I know I am as I have a 12 x 8 greenhouse that has cost me less than £200 and some of my time.
If anyone has any questions regarding there own greenhouse build dont hesitate to ask I may be able to advise a little.
Tuesday, 13 August 2013
I Built a Fence and a Gate.
I built a fence, all by myself. Granted it was not a big one but it looks good I think. Plus it does the job of keeping the Hens of my veggies and confusing the cats.I am pretty chuffed with it and even better my partner is too (which is always the most important thing). The Garden in now divided into four small sections starting with the paved patio type area next to the house and then the flower garden in between the shed and what is now the chicken zone! And beyond the allotment and green house.


The garden however looks a mess, I have several major projects on the go, including the greenhouse glazing (almost done) and some raised beds just infront of it (also almost done) So everything else looks rather shabby. The hens are not helping either and have escaped several times in to every part of the garden. Hence the fence and soon a new gate to the flower garden.
Wednesday, 31 July 2013
From Sun to Rain
This has been an amazing summer so far, I can not remember such a sunny and warm one since I was a kid in the 90's. It's been brilliant! Even when the rain has come its still been warm and the garden has loved it! On the other hand it has made me rather lazy and many garden jobs have been neglected, my excuse as used by many nationwide "It's Too Hot!" has left me procrastinating.
The big summer project, the greenhouse has seen little forward momentum for several weeks. My heart sinks at the thought of glazing it all on my own, I don't know why it's just not a job I want to do. If I could afford it this is something I would pay someone to do!
With the weather being so good my veggie patch had started to produce enough that dinner time is almost all home grown. This has to be the best part of the year and fills me with great satisfaction. My new potatoes were a dinner time sensation!
The rain has now arrived and I am glad of it, it great to not water the garden.
Sunday, 21 July 2013
The Stress of Keeping Animals
So the last couple of days has been ever so stressful as one of my chickens became ill. I have only had them for a few weeks and they have settled in very well and become very used to me already. They come running when I appear, I must spoil them with bread scraps to much! The Chicken that became ill was Speckle, when I let them out of the coop she was very lethargic, and was dribbling profusely.
At first I thought it was from the heat, its been very very hot here. So I let her be for a while. In the time I left her alone she had become worse, sitting in the couple not moving and doing that eye thing chickens do when there not well. I picked her up and on her chest was lots of mucus that was extremely smelly. Its was a sour smell and well I knew something was up then. Luckily my neighbour is a veterinary nurse who also volunteers for a rescue centre and so Speckle was whisked next door.
So it turns out Speckle has Sour Crop which is an infection of the crop. The crop was empty and she was not eating and drinking so we have had to force feed her a wet mash for the last few days to build up her energy levels as well as some probiotics too. We have also given her some medication which seems to have ridden her of the infection for now. That first evening she looked terrible and I was thinking that we might lose her through the night, but by morning she had perked up alot but was not feeding still. As the days have gone by she has improved greatly and today she has been running around and eating for herself. Happy Days.
What got me was the lack of good information online about Sour Crop. I read various forums and pages all with differing accounts on how to treat it etc. I expected to have to deal with illness with my flock but i was not expecting to have to deal with it so soon
I've Gone Poppy Crazy
Like the title says, I have gone poppy crazy this year, out of shear easiness (or laziness) I sowed a few different types in to my flower beds. One bed in particular I was hoping for a spectacular display, however its not quite turned out the way I had envisioned it in my head.Nonetheless I am happy with the flowers I have had and the amount of variation has been great. Here is a selection of what has flowered...


I am not a lover of pink flowers but I really have loved the pink pom pom blooms, The seed for these came I think in some wild flowers mix so I have no idea what its called the others I have bought. Come autumn I will be saving all the seed I can and creating my own poppy mix. I wont be sowing any poppy seed next year at all and will let nature take its course with what ever seeds falls to the ground.


I am not a lover of pink flowers but I really have loved the pink pom pom blooms, The seed for these came I think in some wild flowers mix so I have no idea what its called the others I have bought. Come autumn I will be saving all the seed I can and creating my own poppy mix. I wont be sowing any poppy seed next year at all and will let nature take its course with what ever seeds falls to the ground.
Friday, 5 July 2013
Enjoying the Weather and New Additions
Another short holiday and a break from writing on here, just not found the time or anything interesting to post about. For the most part I have been enjoying the garden, taking it easy really not trying to do too much all the time which I had been doing. But at this time of year you can take it a bit easier just abit of watering here some weeding there and just watch things grow.
Since I last posted we have some new additions to the family, Chickens. Beaky, Matron, Duchess and Speckle.

I have had therm about a week now and they are settling well, already getting some eggs! They are very much enjoying the sunny weather we are having and escaping on to the onion pact and digging up my onions!
Monday, 17 June 2013
Strawberry Planter Project
At the start of the year I bought 30 bare root strawberry plants for the excellent price of £11.50! When they arrived I potted them on into some small pots to grow on. They have soon out grown these and I have been in need of potting them on. For one of the varieties I had made a couple of window box type planters from old pallets, but for the rest I was short of something to put them in. I have looked at the various strawberry planters to buy but none of them really took my fancy and their cost outweighed their utility.
On hunting around the garden and shed I came across a length of 4 inch diameter waste pipe and decided that this would be perfect. This is what it turned out like....


So thats what it looks like as a finished item, and I have to say I was feeling pleased with myself. Its not beautiful but it certainly does the job, and the only thing paid for were two large jubilee clips. On a design level what I was looking for was something portable, cheap and easy for propagating runners.
It was very simple to make, its just a pipe after all. But here is how I did it.
I got my 4 inch pipe, my drill and a 32mm drill bit to make the wholes.

The gaps between the wholes are roughly about 4 inches, I didn't measure at all and did it by eye. I did this all away along leaving roughly 4 inches at each end.

This took no time at all to do, it would take anyone with a better drill than me even less time. With all the wholes in it was time to think about how it was going to sit. Originally I wanted to hang it from the fence but decided against it. My other solution was one I made whilst drilling the wholes and this was what i came up with....

Simple really, the cut out from the pip screwed to 2x2 piece of wood made a perfect stand. As you can imagine I was patting myself on my back for sometime with this little bit of ingenuity. My partner did not share my delight in what I had done, so I showed my like minded neighbour who gave me the praise I thought I deserved!!!I made three of these and they hold the pipe perfectly.
Once all this was done I made the ends, I looked at getting real pipe end caps but the cost of these was to high even on ebay so some black polythene jubilee clipped on was the cheaper better option for me.
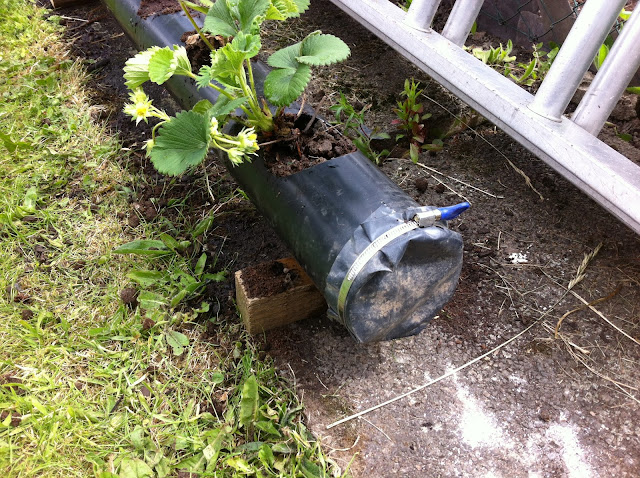
Well that's it really, it works. There is one thing that I will add when I replant in a year or so, a watering system of some kind that runs through the pipe. at the moment the water runs of alot. But it will do for now.
Sunday, 9 June 2013
Garden Music
When I am out in the garden I do like to listen to music and I think take inspiration from it. Two bands come to my mind that I really feel influence my approach to the garden, as weird as that sounds. Certain songs really resonate and instantly make me think about my garden. I have never heard of a musically inspired garden but I hope there are some out there. I am sure there are. Well the first of the two bands that I feel influence and inspire me is, British Sea Power. If you have not come across them before...... They are amazing in my unbiased and not at all obsessive opinion. The entire aurora (for the lack of a better word) really touches me, not just the music, but the ideals they up hold, charisma...... well just everything about them really. I can not imagine who I would be with out coming across their single 'Carrion' in 2002/03. I met my partner through are mutual love of this band as she was the only other person I had met who knew who they are! This is a band that will write songs about the Larsen B ice cap, you won't see One Direction do that anytime ever! Anyway here is a selection of songs that I love to listen too in the garden. First up I must have 'Carrion' as this is were it all starts.
The next song speaks to the environmentalist in me, its very rare to here a song like this that tackles a subject like this and does not sound over the top and ridiculous. This is 'Childhood Memories'.
This one is just so very sweet, 'Do You Wanna Be A Bird'.
I could go on and on and on and on and on and on................and on about BSP, but I will restrain myself and move on to the next band..... Grandaddy. Possibly the greatest band ever to come out of California IMO. I am no expert on bands from California that said. This is 'Broken Household Appliance National Forest'
and........ 'Now its On'
These are a very small selection of songs, I could go on, there are so many that really spark my imagination when I here them. These are some of mine I would love to here if anyone else has music that they listen too in the garden that is also part of their inspiration.
Saturday, 8 June 2013
Blogging at Work on My Phone, How Modern!
I work in hospitality and its been a busy few weeks were I have had very little time to do anything else but work. The garden has taken some of my spare time, but its been mainly rushing around with the watering can in between shifts. I am at work right now writing this on my phone whilst all is quiet.
Tomorrow I have a long awaited day off and time and good weather to get things done. A few things have happen out there on my "estate" which I hope to post about tomorrow. Although things have been crazy at work I have but to wait just seven days for nearly a whole two weeks of freedom and hardcore gardening!
Thursday, 30 May 2013
Garden Walk 29th May
It has been raining for two days straight here and I have not really been up the garden at all, we had a glorious bank holiday weekend but I was working most of it. So in between the showers today I finally went out and took a look. The mix of some good sunshine and now some rain has really done some good.
The Potatoes are going well, both the lates in the raised bed and the earlies in the tubs.


My Tomatoes have been out of the greenhouse about a month or so now and I am quite happy with them. The are Tumbling Tom bush cherry variety, which did really well for me last year.

Mean while in the flowery part of the garden........ Lupins, Digitalis and Forsythia are coming on strong.

One of my two apple trees on blossom, the other looks like it is on deaths door, hardly any leaves and its blossom, what little of it there was has gone brown. I think its dead.

Last year I bought some creeping Thyme which I have moved around a little some of them are doing better that others. I want a carpeted area of it so I can rub my hands amongst it.

In the shed bed, the Dog Daisy (Leucanthemum vulgare) surrounding my tiny Kiwi Vine has taken well, to its left some Lily's of some kind and to its right the old rose bush that was in the bed when we moved in. All the earthy gaps I have filled with wild flowers and poppy's for this year.

Lavander is slowly growing around my now dead looking Discovery apple tree.

My Shady plants are happy too, one of my astilbe's below.

And finally the ferns and Hosta's, which I am growing on in pots and buying more of until I get round to building my Shade Garden Planter some time this summer.

Subscribe to:
Posts (Atom)